|
| 20 Nov 2014 11:05:57 am |
 centos two service not start centos two service not start |
|
|
service php-fmp start
service mysqld start |
|
| |
Category : Unix&Linux
| By : Eric Shan |  Comments [0] | Comments [0] |  Trackbacks [0] Trackbacks [0] |
|
|
|
|
| 27 Oct 2014 05:19:15 pm |
| 橡皮艇,独木舟,淀山湖下水的一些发现 |
|
|
倾覆自救
http://v.youku.com/v_show/id_XNzc0OTY1NzA4.html
http://bbs.sjtu.edu.cn/bbstcon?board=outdoor&reid=1412779559
http://club.pchome.net/thread_1_15_8192255.html
http://www.faxian.com/xiangcun/7153.html
http://www.ishenbao.com/epaper/sjfwdb20120822/201208/t20120822_774537.htm
http://www.doyouhike.net/forum/aqua/
http://lightkayak.lvguanjia.cc/activity/detail?id=6823 |
|
| |
Category : Life
| By : Eric Shan | Comments [0] | Trackbacks [0] |
|
|
|
|
| 22 Oct 2014 03:24:28 pm |
| 贝多芬钢琴奏鸣曲全集 |
|
|
c小调第八钢琴奏鸣曲《悲怆》,德国作曲家贝多芬作品第13号
创作于1798年至1799年初,作品献赠给他的赞助人与仰慕者利赫诺夫斯基王子。
本曲是贝多芬早期钢琴奏鸣曲之顶峰的杰作,也是因其戏剧性的优美旋律而为世
人所熟悉的作品。
本曲无论在内容、旋律和结构等诸多方面,都渗透着一种日耳曼民族特有的理性,
这也是贝多芬等德国音乐家共有的特质。本曲的演奏技巧并不太难,因此被演奏
的机会也非常之多,更是许多钢琴初学者爱不释手的曲目。在贝多芬的钢琴奏鸣
曲中,《悲怆》是贝多芬奏鸣曲中两部由他本人亲自写上标题的作品之一(另一
首为《送别》No.26)。
关于“悲怆”这个词汇,与贝多芬后半生那感人肺腑而又凄怆深刻的悲剧性生活
还有相当的一段距离,因为这毕竟是他的早期作品。
http://pan.baidu.com/share/home?uk=3442471476&third=0#category/type=0 |
|
| |
Category : Life
| By : Eric Shan | Comments [0] | Trackbacks [0] |
|
|
|
|
| 16 Oct 2014 10:38:41 am |
| nginx限制站点登陆 |
|
|
# access to sqladmin
location /sqladmin {
alias /var/www/html/sqladmin/;
allow 127.0.0.1;
allow your.ip.addr.ess;
deny all;
index index.php index.html index.htm;
}
http://www.nginxtips.com/how-to-install-phpmyadmin-on-nginx/ |
|
| |
Category : Unix&Linux
| By : Eric Shan | Comments [0] | Trackbacks [0] |
|
|
|
|
| 13 Oct 2014 10:03:25 pm |
| nginx phpmyadmin 报错 |
|
|
我靠,
我在nginx上安装phpMyAdmin
1.Yum Install phpMyAdmin,
2.mv phpMyAdmin 到 home folder下,/usr/share/nginx/html/
3.用ip address/phpMyAdmin报,
Cannot start session without errors, please check errors given in your PHP and/or webserver log file and configure your PHP installation properly. Also ensure that cookies are enabled in your browser.
4.google后要开通权限给/etc/php.ini提到的session路径,chmod 777 /var/lib/php/session,没有的话自己创建下.
http://my.oschina.net/grail/blog/158515
5.还是报3的错误,refresh下ie.
6. install mysqli extension,重启php-fpm
真复杂。 |
|
| |
Category : Unix&Linux
| By : Eric Shan | Comments [0] | Trackbacks [0] |
|
|
|
|
| 11 Oct 2014 04:36:05 pm |
| CentOS, install nginx, php (php-fpm), mysql server, phpmyadm |
|
|
1. Yum install nginx,
-Stop httpd (appache server), service httpd stop
-yum remove httpd
-yum install nginx, to add nginx into yum, see this: http://wiki.nginx.org/Install
-When done, check file of /etc/nginx.conf and /etc/nginx/conf.d/default.conf
-得知 page 在/usr/share/nginx/html
more infomation about Virtual Domains, see https://www.linode.com/docs/websites/nginx/basic-nginx-configuration
2.Yum install php-fpm
此间一直实验不出php,报404出错,后来查到此贴才解决问题。
http://stackoverflow.com/questions/17808787/file-not-found-when-running-php-with-nginx
原来默认设置里的这句是错的fastcgi_param SCRIPT_FILENAME /scripts$fastcgi_script_name;
改为正确路径就对了。
3.Install mysql and phpmyadmin:
https://www.digitalocean.com/community/tutorials/how-to-install-and-secure-phpmyadmin-on-a-centos-6-4-vps
其中不要忘记设置mysql的root密码 |
|
| |
Category : Unix&Linux
| By : Eric Shan | Comments [0] | Trackbacks [0] |
|
|
|
|
| 07 Oct 2014 11:56:58 am |
| CentOS VPN setup |
|
|
1.开通TUN/TAP,开通PPP
2.安装相关软件包
32位版:
# yum install -y ppp libpcap iptables
# wget http://poptop.sourceforge.net/yum/stable/packages/pptpd-1.3.4-2.rhel5.i386.rpm
# rpm -ivh pptpd-1.3.4-2.rhel5.i386.rpm
64位版:
# yum install -y ppp libpcap iptables
# wget http://poptop.sourceforge.net/yum/stable/packages/pptpd-1.3.4-2.rhel5.x86_64.rpm
# rpm -ivh pptpd-1.3.4-2.rhel5.x86_64.rpm
如果发生PPP版本不对,可以查看http://poptop.sourceforge.net/yum/stable/rhel5Server/选取合适版本,一本同目录下有ppp包,如ppp-2.4.4-14.1.rhel5.x86_64.rpm
3.配置文件编写
①、配置文件/etc/ppp/options.pptpd
# mv /etc/ppp/options.pptpd /etc/ppp/options.pptpd.bak
# vim /etc/ppp/options.pptpd
输入以下内容:
name pptpd
refuse-pap
refuse-chap
refuse-mschap
require-mschap-v2
require-mppe-128
proxyarp
lock
nobsdcomp
novj
novjccomp
nologfd
idle 2592000
ms-dns 8.8.8.8
ms-dns 8.8.4.4
#这里的DNS可以查看服务器本机使用的DNS地址。
②、配置文件# /etc/ppp/chap-secrets
# mv /etc/ppp/chap-secrets /etc/ppp/chap-secrets.bak
# vim /etc/ppp/chap-secrets
输入以下内容
# Secrets for authentication using CHAP
# client server secret IP addresses
myusername pptpd mypassword *
注:这里的myusername和mypassword即为PPTP VPN的登录用户名和密码, 改成你自己的。
③、配置文件/etc/pptpd.conf
# mv /etc/pptpd.conf /etc/pptpd.conf.bak
# vim /etc/pptpd.conf
输入以下内容:
option /etc/ppp/options.pptpd
logwtmp
localip 192.168.80.1
remoteip 192.168.80.11-30
注:为拨入VPN的用户动态分配192.168.80.11~192.168.80.30之间的IP
④、配置文件/etc/sysctl.conf
# vim /etc/sysctl.conf
修改以下内容:
net.ipv4.ip_forward = 1
保存、退出后执行:
sysctl -p
3、启动PPTP VPN 服务器端:
(# /etc/init.d/pptpd start)
service iptables start
# restart the firewall
service iptables restart
# stop the firewall
service iptables stop
4、设置iptables规则并重启:如果没有iptables文件,执行
/sbin/service iptables save
编辑iptables
# vim /etc/sysconfig/iptables
文件尾部,commit前加入下列规则:
-A POSTROUTING -s 192.168.80.0/24 -o eth0 -j MASQUERADE
-A POSTROUTING -o venet0 -j MASQUERADE
5.最后配置windows PPTP VPN客户端
参考:
http://www.ha97.com/4722.html
FW configurations: http://www.cyberciti.biz/faq/rhel-fedorta-linux-iptables-firewall-configuration-tutorial/
https://www.centos.org/docs/5/html/5.2/Deployment_Guide/s2-sysconfig-iptables.html |
|
| |
Category : Unix&Linux
| By : Eric Shan | Comments [0] | Trackbacks [0] |
|
|
|
|
| 29 Mar 2012 08:05:39 pm |
| 德签面约email收不到,怎么办 |
|
|
赴德面约签证,网上预约成功后,居然没有收到确认的email. 打电话也没有人接。后来就试着发email给visa-information@shan.diplo.de,居然第二天就有了回音,并且告知用英语或者德文把你的名称护照号码等发过去,果然第四天就收到了重发的email.
不过德领馆的系统是有点问题,后来我帮人家预约,4个里面也只收到一个email.这么简单的程序都做不好,真丢德国人的脸。
其实email本来就不可靠,为什么不在成功预约后当场显示一个预约成功页面供打印不就得了么。不知道德国人是怎么想的,自己给自己添麻烦。
此外,面约的网站并不是很容易就得到面约机会的,特此还特地写了段php代码跟踪网站的动向,一有动静就用email通知我,这样果然就等到了机会。面约机会出现是随机的,但是基本上是在早上,有9点,10点,11点的都看到过,有一次5月25号的出现了15个预约名额,而其它的时候大多只有一两个名额,看来是有人取消后,德领馆会不定期的更新。 |
|
| |
Category : Life
| By : Eric Shan | Comments [0] | Trackbacks [0] |
|
|
|
|
| 24 Oct 2011 08:39:43 pm |
| Google and Gmail slow in Shanghai China- Google和Gmail慢 |
|
|
Recently, google and gmail access is very slow for Shanghai China user, especailly for China Telecom users. The problem identified from China Telecom is that they now have problem in their network and hopefully can be resolved quickly (means never resolved).
There are 2 ways you can do now,
1. Call 969112, report gmail and google slow, then if you are lucky you will be resolved in 2 min, some user said China Telecom will change your network parameter and routing you to a quick network, but some other networks are becomes slow.
2. Using socket proxy and cross the firewall by the way, you can refere to one of my artiles
近日,有不少上海地区的电信用户发现google和gmail慢,甚至上不去,现在电信已经承认网络有问题需要时间解决。你有两个办法。
1.致电969112,要求他们修复,有用户反映可以在几分钟内恢复,但是其它网络可能会变慢。
2.要么就翻墙喽,一劳永逸。 |
|
| |
Category : Life
| By : Eric Shan | Comments [0] | Trackbacks [0] |
|
|
|
|
| 24 Oct 2011 07:48:39 pm |
| Using SSH to cross Chinese internet Firewall- 用SSH翻墙 |
|
|
In recent technology, WEB hosting with SSH ftp upload function is quite normal and almost becomes a standard service, but do you know it can be used as a Socket proxy. This is useful when you need cross the firewall (in China we called it GFW). Below is a quick introduction on how to do it.
1. Find a host plan with SSH service provided, e.g. an affordable service like Joomjump (USD 9.99 per year, unlimited bandwidth), and write down the user name and password of the your service account, let's say 'myUserName' and 'myPassword'.
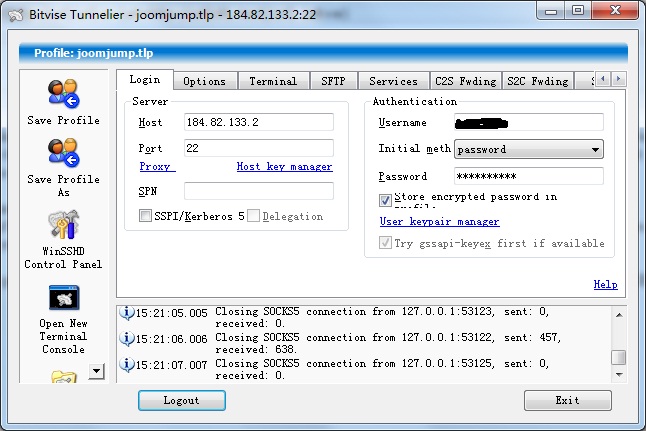
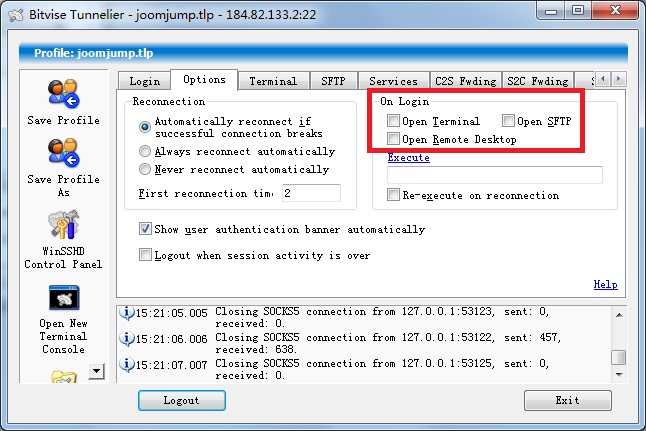
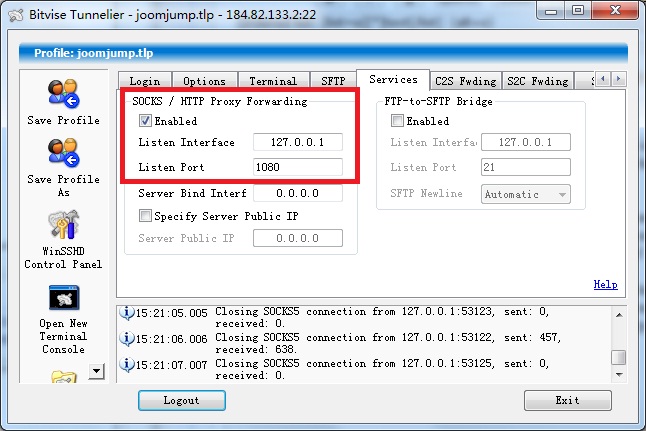
2. Download the proxy software Tunnelier.exe, and run it for installation. After that you can start to input your server IP address, your user ID and password, the port is normally 22 if your service vendor did not change it (see picture I). In the service tab, enable the socket proxy service like picture II. If you do not want to see Tunnelier open the ftp window, you can choose not to open ftp when start it (pic III).
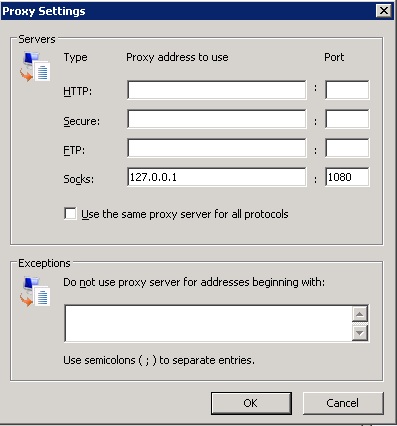
3. In your IE or firefox, change the proxy settings, and make sure the port is what you have setup in Tunnelier.
Now enjoy your private proxy server now, and don't be suffered any more.
用SSH翻墙大致有三步。
1. 找一个可以提供SSH FTP服务的海外空间商,例如9.99刀一年不限流量的Joomjump ,记下购买后得到的服务器地址,用户名和密码。
2.下载 Tunnelier.exe,然后运行并安装,安装完成后设置几个东西,输入服务器地址,用户名,密码。在Service里设置激活sock/ proxy http forwarding, 如果你不想每次在打开Tunnelier时看到ftp,那就关掉它。
3.在IE里修改proxy参数,把其它都填空,唯独输入socket既可。 |
|
| |
Category : WEB programming
| By : Eric Shan | Comments [0] | Trackbacks [0] |
|
|
|
| |
| Prev 1 2 3 ...5 6 7 Next |